In this article we’ll take a look at how astronomers use parallax to measure distances to stars that are up to 30,000 light-years away.
There are two simple concepts that we must understand before we continue:
1) The phenomenon of parallax
2) The concept of an object’s parallax angle
Let’s get started.
What is parallax and how can we visualize it?
Most of us have experienced parallax while looking out the window of a moving train or car. Closer objects seem to whiz by as we pass by them, while objects that are further away appear to move significantly slower. The following video demonstrates this:
Notice how mountains in the background move very slowly, while closer objects, such as trees and buildings, seem to whiz by. This phenomenon, wherein, as our point of view changes, closer objects appear to move faster than further objects, is called parallax.
So far so good. Let us now take a look at what an object’s parallax angle is.
What’s a parallax angle and how can we visualize it?
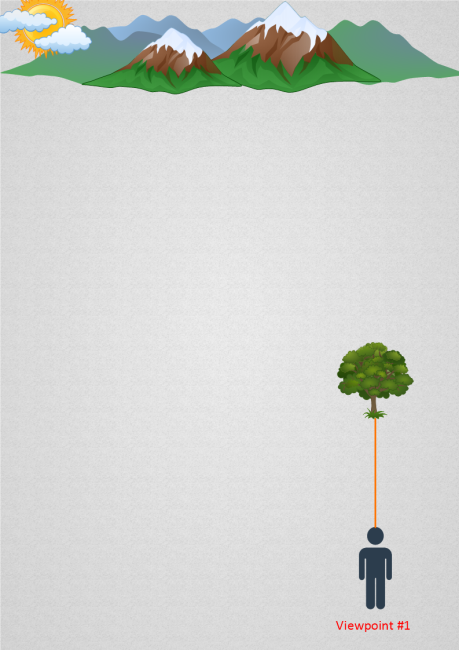
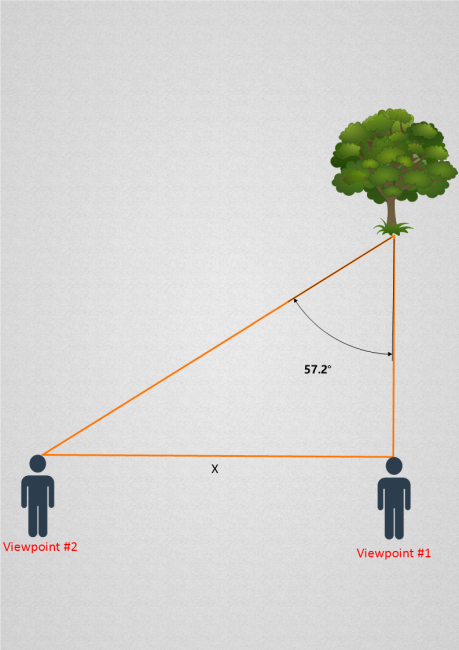
Imagine you are looking towards a green tree. Let’s refer to the location where you are standing as viewpoint #1:

If you were to visualize a line extending from you location towards the tree, it would look like this:
This is your line of sight. Now imagine moving to the left by some distance X. We’ll call your new location viewpoint #2:
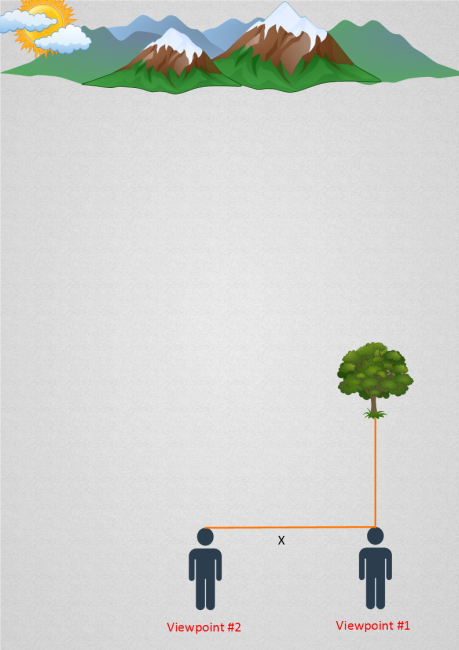
Let’s extend a second line of sight, from viewpoint #2 and towards the tree:
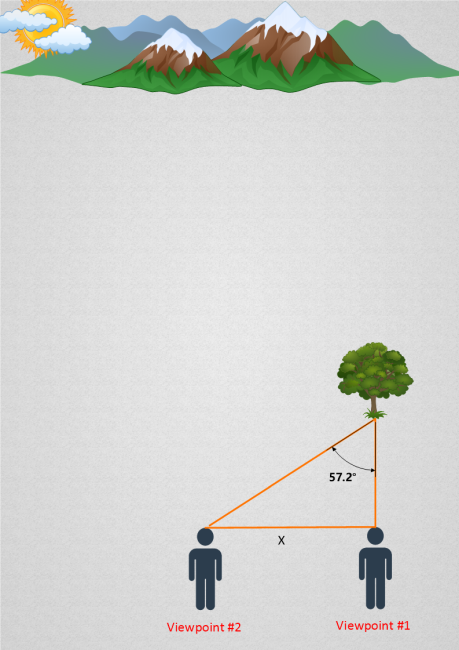
The 57.2 degree angle marked above is what we would call the tree’s parallax angle.
Here’s an important realization: the further an object is, the smaller its parallax angle will be. The following image should illustrate this:
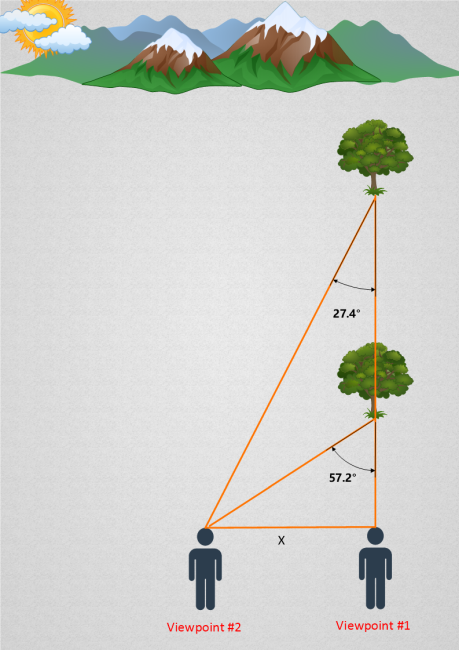
Here’s a slightly more formal definition of the parallax angle:
An object’s parallax angle is the angle formed between two different lines of sight extending towards that object.
Simple enough.
Now comes the fun part. If we can obtain:
- The measurement of an object’s parallax angle
- The distance between the two viewpoints (in our case that would be X)
… then we can calculate the object’s distance using nothing but basic high-school trigonometry. To see how, let’s zoom in on one of the previous diagrams:
Let’s suppose the distance X between both viewpoints is 20 meters. Let us also name the remaining two sides of the triangle and color-code the diagram to make it easier to follow:
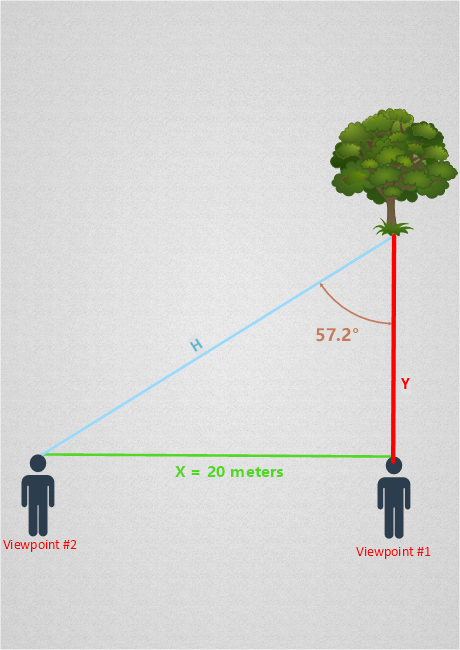
By solving for the lengths of sides H and Y, we will have determined the distance between the tree and both viewpoints. Here’s how we do it:
You may have noticed that we are dealing with a right triangle, which is a triangle with one angle measuring exactly 90 degrees. In any right triangle, the tangent of an angle is equal to the length of the side opposite that angle divided by the length of the side adjacent to the angle. Put another way, the Tangent of 57.2 is equal to 20 divided by Y.
Here’s the math:

We can rearrange the above to solve for Y:

Plugging the above into a calculator we find that Y = 13 meters. This is the distance between the tree and viewpoint #1. To figure out the distance between the tree and viewpoint #2, which is simply the length of side H, we can use the Pythagorean theorem:
![H =\sqrt[2]{20^2 + 13^2} = 23.9](http://referenceframe.net/wp-content/ql-cache/quicklatex.com-c0929ddf60c67b832479d371db02545a_l3.png "Rendered by QuickLaTeX.com") meters
meters
Here’s an illustration with all distances included:
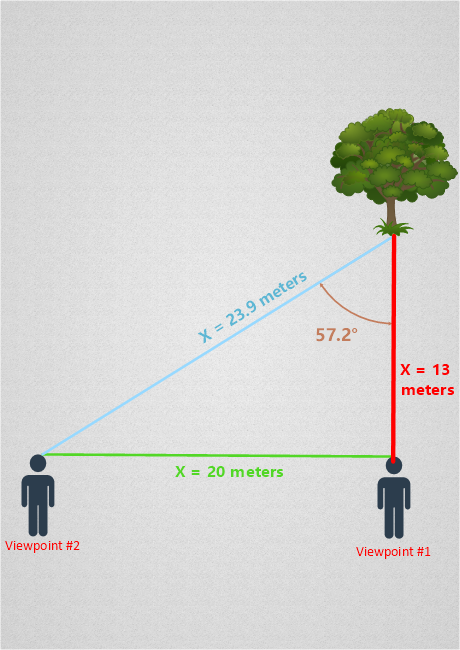
Great! By simply looking at an object from two different locations and measuring the angle between two lines of sight, we were able to figure out how far away that object was. We can now take a look at how astronomers use this knowledge to measure distances to faraway stars.
Let’s summarize what we’ve learned so far:
- The further away an object, the smaller its parallax angle. The opposite is also true.
- In order to measure an object’s parallax angle we must look at it from two different viewpoints.
- Knowing the parallax angle of an object and the distance between both viewpoints allows us to figure out the distance to that object.
How do astronomers measure distance to stars using parallax?
One of the implications of what we already know is that in order to measure the distance of a celestial object, we must be able to measure its parallax angle. This means that our ability to use the parallax method to measure distances is limited by our ability to accurately measure extremely small angles. For objects that are sufficiently far away, the parallax angle is so small that we need to measure it in arcseconds, or even fractions of an arcsecond. An arcsecond is equal to  of a single degree.
To put this in perspective, consider that the parallax angle of Alpha Centauri, which at 4.36 light-years away is the closest star to our solar system, is equal to about  of a single degree. This means that our ability to calculate distances using parallax is limited by our ability to measure extremely small angles. As of December 2017, the GAIA Space Telescope is our best tool for the job – it can measure the parallax angle of objects as far as 30,000 light-years away. If this doesn’t seem impressive, consider that this involves measuring angles to the tune of
  of a single degree. That’s one over 33 million.
When astronomers attempt to measure the distance to a star, their primary objective is figure out that star’s parallax angle. Once they have that, determining the distance is a matter of simple trigonometry, as we saw earlier. So the real question becomes: how do astronomer’s measure a star’s parallax angle? Let’s go over a step-by-step illustration.
Step #1: select a distant reference point
We begin by choosing a distant reference point that is so far away it seems not to move at all from Earth’s perspective. Such objects typically include other galaxies, the closest of which, Andromeda, is 2.2 million light-years away. Because galaxies will be thousands or even millions of times further than any objects whose distance we would attempt to measure using the parallax method, those galaxies will appear to be completely stationary, even when observed using our best telescopes. In other words, their parallax angle will appear to be zero.
By picking such a distant object we now have a stationary reference point that will allow us to measure the star’s change in location as seen from Earth. We’ll see how this relates to the object’s parallax angle in a moment.
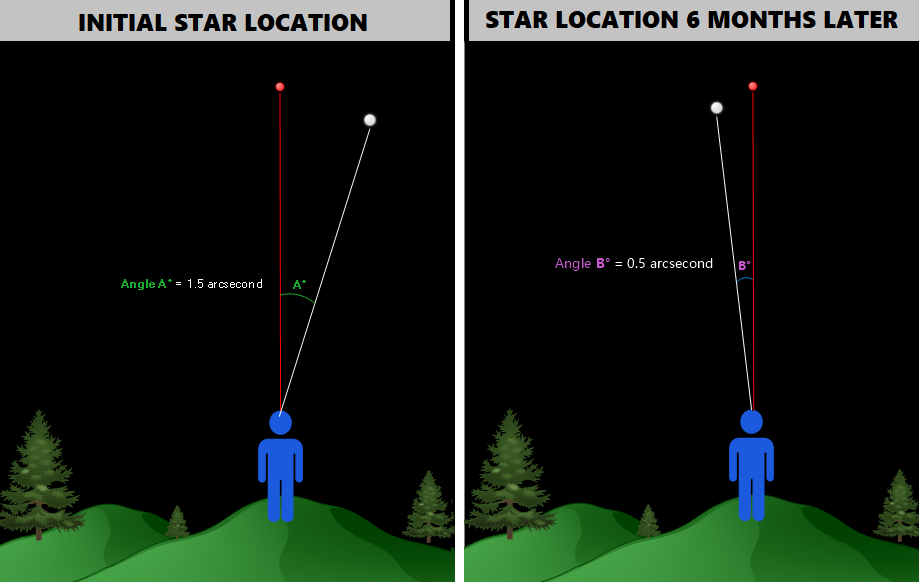
Step #2: measure the angle between our reference object and the star
Imagine we are looking up at a night sky. The red object is the extremely-distant reference point (galaxy) that we picked in the previous step. The white object is the star we’re attempting to measure our distance to. Keep in mind the red reference object might be thousands or even millions of times further than the white one.
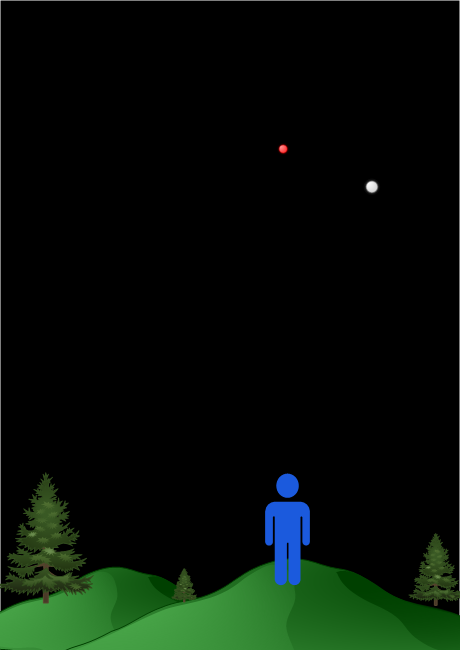
We now extend two lines of sight from our location – one line towards the reference object, and the other line towards our star of interest:
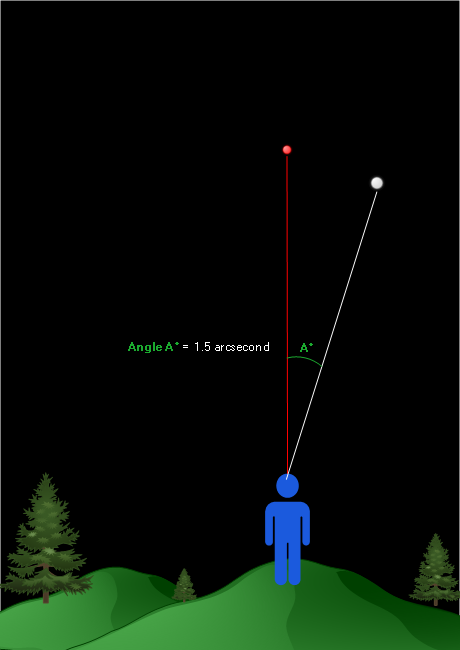
Let’s assume we measure angle A to be 1.5 arcseconds. Note that this image is not to scale; an arcsecond is equal to of a single degree. If I were to draw the image to scale, the angle would seem to be zero to our unaided eye.
Here’s what the above image would look like from an overhead view of the universe:
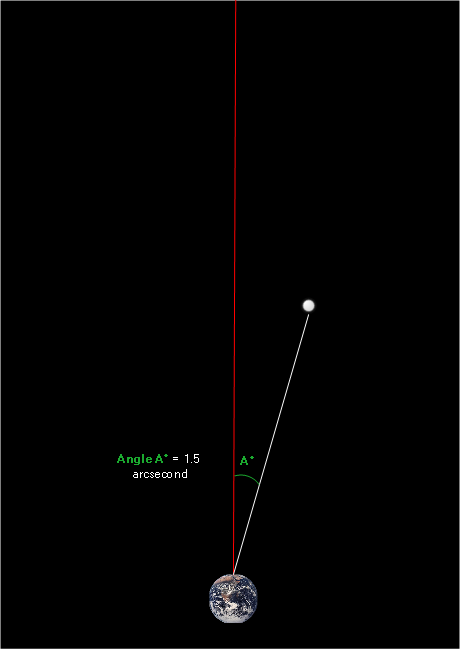
Because our reference object is extremely far away relative to our star of interest, the red line, which points towards the reference object, extends far outside the screen.
We record the value of Angle A and move on to the next step.
(To get a feel for what equipment astronomers actually use to measure these angles, scroll down to the last section in this article.)
Step #3: measure the same angle six months later
We now need to take a look at the star from a different viewpoint (remember – we need to look at the object from two different viewpoints to determine its parallax angle). To do that, we wait six months until planet Earth has completed half an orbit around the sun. This will place us in a completely new location in the sky, making for a different viewpoint than earlier. We take another look at the star and might see something like this:
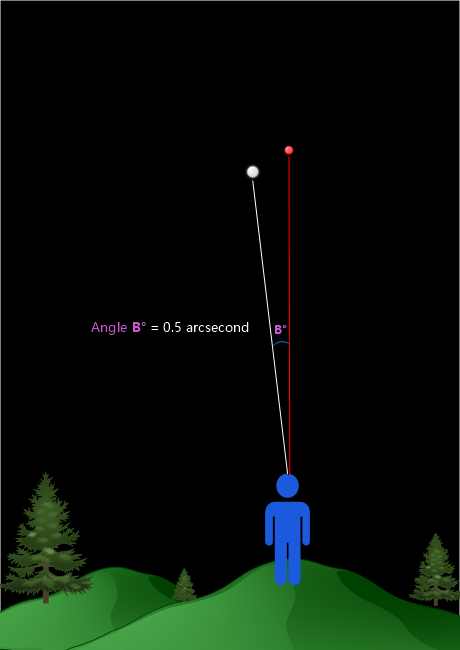
The star’s position relative to our stationary reference object seems to have changed. We measure Angle B to be 0.5 arcsecond.
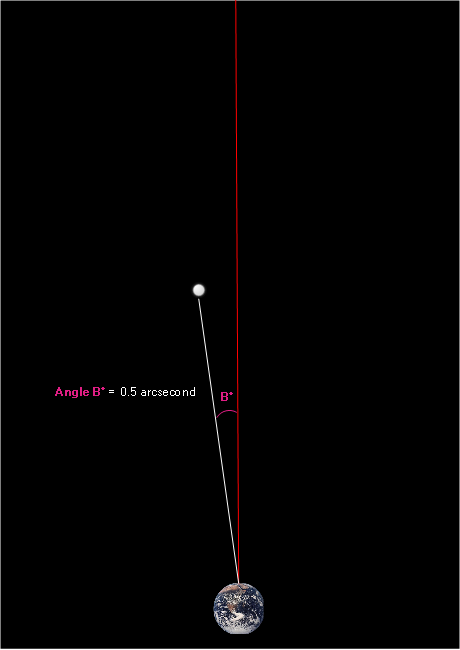
Here’s the same thing as seen from “above” Earth:
To recap, this is what we saw:

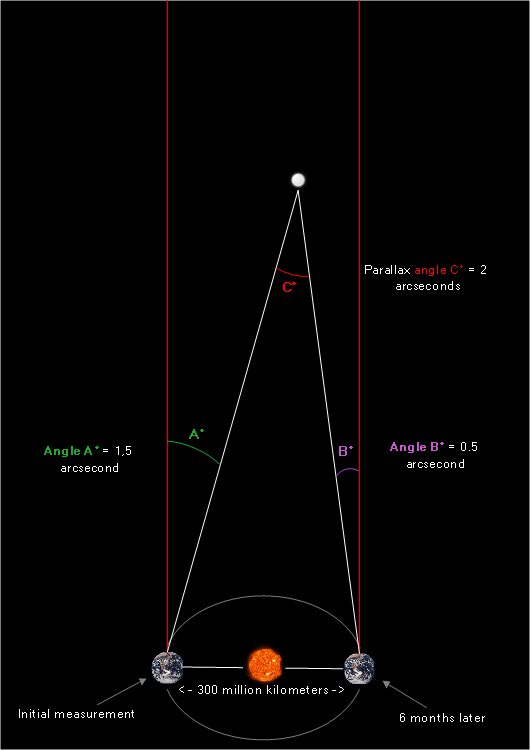
We know from independent measurements that Earth’s displacement during a half orbit (six months) equals roughly 300 million kilometers. Therefore, if we were to combine both overhead-view images, we’d get the following:
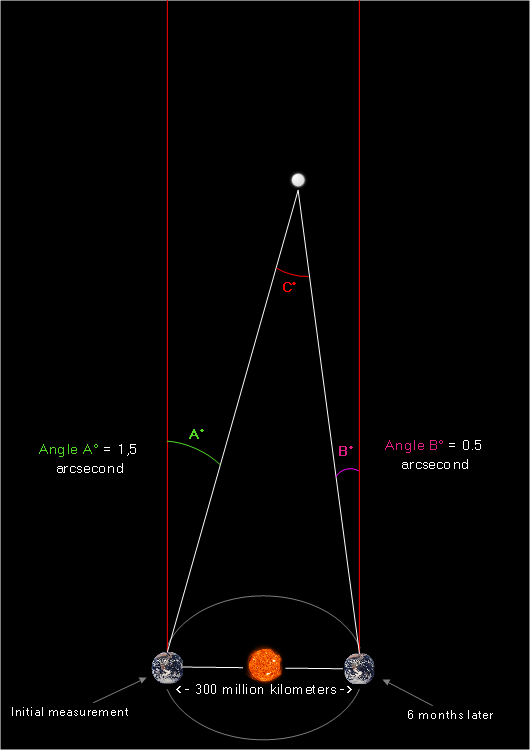
(Again, please keep in mind that distances and angles are not to scale – not even close)
Nothing new happened here; we simply combined both overhead images and then accounted for the distance that planet Earth would have moved during those six months between the two angle measurements.
Angle A is the angle measured initially, angle B is the angle measured six months later, and angle C is what we’ve been looking for – the parallax angle! It’s the angle formed between two separate lines of sight (two different locations in Earth’s orbit) extended towards the star.
We’ve already established the measurements of angles A and B. We also know the distance between both viewpoints – it’s 300 million kilometers. But how do we figure out the measure of our parallax angle – angle C? After all, we can’t just fly off to the star and use a giant protractor.
However, what we can do is use some high-school geometry. Here’s what it boils down to:
1) If angle A and angle B are formed on different sides of the red reference line, we add the values of both angles together to obtain the measure of angle C – the parallax angle.
Example:
Our image above is a great example of this scenario. You will notice that angle A is formed to the right of our reference line, while angle B is formed to the left of the reference line. Because both angles are on different sides, we add them together to obtain the measurement of our parallax angle C:
 arcseconds
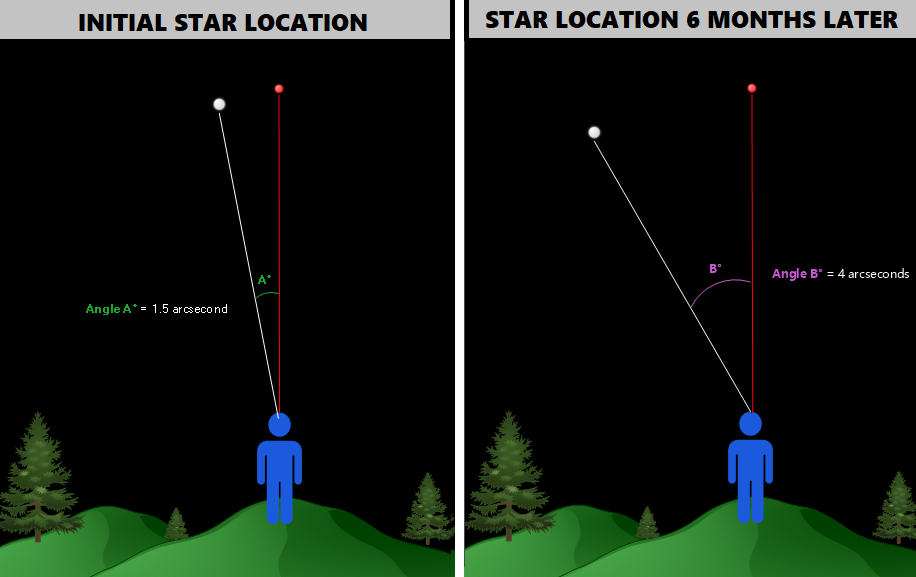
However, angles A and B don’t have to be on opposite sides of the reference line – they might just as well end up on the same side. In which case:
2) If angle A and angle B are both formed on the same side of our reference line, then we subtract the smaller angle from the larger angle to obtain the measure of angle C – the parallax angle.
Example:
Suppose that instead of what we saw earlier in the sky, which was:
We saw the following:
An overhead diagram obtained from combining the two measurements above would look as follows:
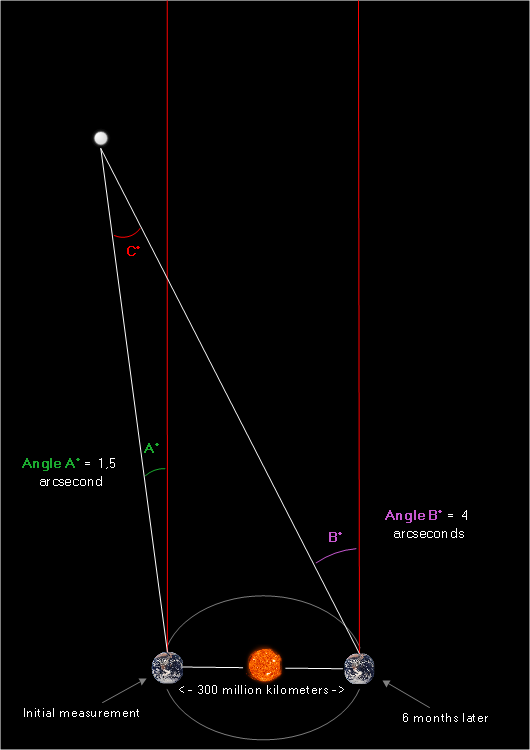
We can see that angle A and angle B are both formed to the left of our red reference line. Because both angles are on the same side of the line, we can obtain angle C by subtracting:
 arcseconds
Interesting observation: we can imagine how if both angles A and B in the image above were equal, then subtracting one from the other would equal zero. This makes perfect sense – if both the ‘before’ and ‘after six months’ angles were equal then it means the star did not seem to move in the sky at all, and hence its parallax angle should appear to be zero.
Now that we’ve measured the star’s parallax angle, we can calculate its distance
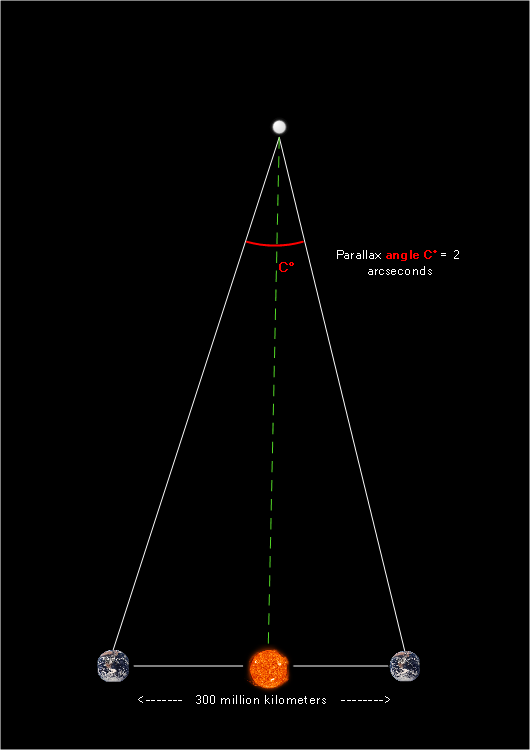
Let’s go back to our original problem:
Earlier in the article we stated that if we know the parallax angle and the distance between both viewpoints, we can figure out how far away an object is using basic trigonometry of right triangles. We know the parallax angle measures 2 arcseconds, and we know the distance between the two viewpoints (Earth’s two locations) is 300 million kilometers. What we need to do now is represent this problem as a right triangle problem – this way we’ll be able to use the tangent relationship to solve for the star’s distance.
So how do we represent the above in terms of a right triangle?
What may not be readily apparent from this image is that we are dealing with an isosceles triangle, or a triangle with two sides of equal length. One might ask: “but isn’t the left side of the triangle longer than the right side?” and the answer would be: “yes, but it only appears this way in the illustration due to the complete lack of scale.”
We must keep in mind that the measures of angle A and angle B are in reality such tiny fractions of a single degree that any inequality between the length of the two triangle sides can be safely ignored.
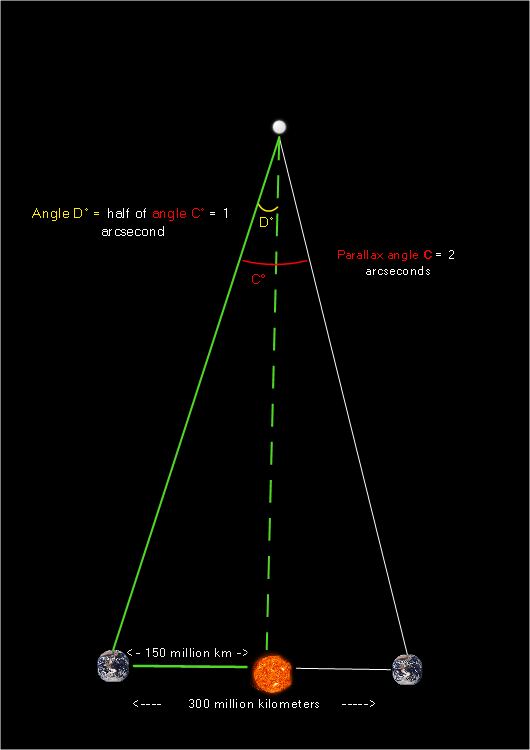
If we assume the triangle above is almost perfectly icosceles, we can take advantage of isosceles triangles’ law of symmetry: by drawing a line from the top of the triangle to the middle of its base, we will end up with two smaller triangles. Here’s what this symmetry line would look like after cleaning up the image and stripping away information we no longer need:
We know from isosceles triangle geometry that the symmetry line splits the larger triangle into two smaller triangles, each meeting the following criteria:
- The measure of its top angle equals half the measure of the larger triangle’s top angle (angle C)
- The length of its base is equal to half the length of the larger triangle’s base.
- It’s a right triangle (this is what we were after!)
Here’s what one of the two smaller triangles looks like. I’ve colored all three of the triangle’s sides green to draw attention to it:
Now that we’ve managed to represent the problem in terms of a right triangle, we can use the tangent relationship to solve for the star’s distance, marked X below:
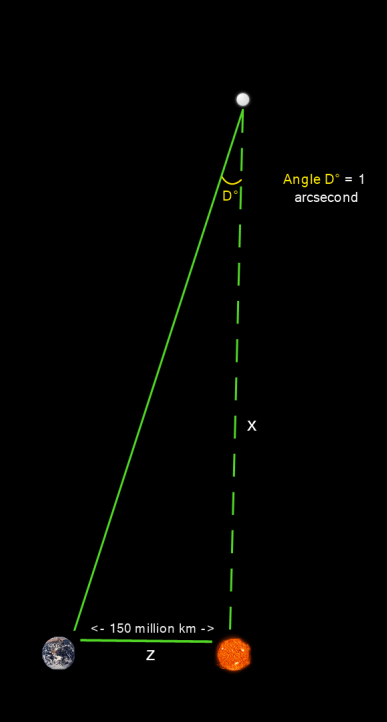
Remember that the tangent of an angle in a right triangle is equal to the length of the side opposite that angle divided by the length of the side adjacent to the angle. In our case, this means that the tangent of angle D is equal to side Z (opposite) divided by side X (adjacent). Knowing that one arcsecond is equal to of a degree, we can use this tangent relationship to solve for the length of side X, which represents the distance between the star and our own sun.
The math:
Tangent of 1 arcsecond = 150 million kilometers divided by X, or:


 kilometers
That’s 31,000,000,000,000 kilometers or 31 thousand billion kilometers or 31 trillion kilometers. This also converts to 3.26 light-years, which happens to be the astronomical unit of measurement we call the parsec.
It’s interesting to note that Alpha Centauri, the star closest to our solar system, is around 1.34 parsecs away.
What equipment do astronomers use to actually measure these tiny angles?
In this day and age, astronomers no longer use a sextant to measure the angular change of celestial bodies. Rather, they take measurements using modern CCD cameras. These cameras are programmed to capture objects in a grid-like view. This grid is mapped to the night-sky based on centuries of observations of different stars’ movements relative to extremely distant objects throughout the year. Every grid-box corresponds to a certain angular change.
For example, if the grid is set-up so that every single box represents one arcsecond, and we obtain the following data:
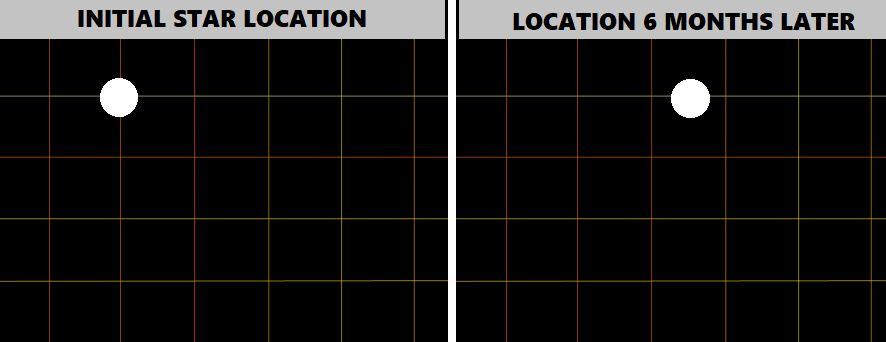
Because the star appears to have shifted by 1.5 grid-box, astronomers know that the star’s angular displacement over this six month period was 1.5 arcseconds. Note that these grids are calibrated to account for the object’s height above the horizon; for objects that are higher above the horizon, a shift by a single grid-box will indicate a larger angular displacement than a similar shift of a single-box for an object that’s closer to the horizon.
If you have any questions, feel free to ask them in the comments section below. I’ll be happy to answer.